Friday, June 28, 2013

Make it yourself-Shake and Bake Pork chops

I love shake and bake on chicken and pork chops.  I would have never thought to make them myself if it weren't' for the fact that I needed to make dinner and couldn't get to the store one night.  This recipe is even better than store bought, as it uses fresh bread crumbs.


Place 2 cups of bread crumbs into a large gallon sized baggie.  To the bread crumbs add
1/4 cup of vegetable oil,
1 1/2 tsp salt
1 1/2 tsp paprika
1 tsp celery salt
1 tsp onion salt
1/4 tsp black pepper (or more to taste)
1 tsp poultry seasoning


Shake this in the baggie to mix well.  You can also use your fingers to "knead" it, making sure that the oil is completely incorporated.


I mark the baggie with the contents and the date, and put it in the freezer.

When you're ready to use, take out what you need a place it on a plate.


Rinse the meat you're going to use under the tap.  In this case I'm using boneless pork chops.

One at a time, dip the pork chops in the shake and bake that you've placed on the place.  Make sure the whole thing gets coated, including the sides.  Line the baking sheet with foil to make cleanup easier later.


I baked these for about 40 minutes at 350 F.  They don't need to be turned while baking either.


Delicious.   They taste like ones made with store bought coating, only better!

Make Your Own Bread Crumbs

Those bread crumbs that people buy at the supermarket smell stale. Gross.  Why not make your own with leftover bread?  You always have some of that around.  That way you decide what bread you use, and it's always fresh!

You'll need some day old bread, or bread that you have in the freezer that you need to use up.  I use a blender to crush them, but that's optional.  You can crush them in a baggie or the empty bread bag too.


Today I had some hamburger rolls in the freezer, and I needed to use them up.  Cut up the bread in chunks that are generally the same size


Place them on a cookie sheet.  Spread them out as much as possible.


Set oven to 350F.  Place the cookie sheet on the middle rack and cook until the chunks are bread are browned. (appox 20 minutes)  Keep and eye on them, and be careful that they don't burn!


After they've cooled for a few minutes, I start crushing them in the blender.  I like the use the blender (or food processor) to crush them because I end up with finer bread crumbs in the end.


Put bread chunks into the blender a few at a time, and pulse until all have been crushed. If you don't have a blender or a food processor, you can simply put the bread chunks into a large baggie or bread bag and roll over the bread in the bad with a rolling pin or other rounded object that gets the job done.


Place them in a gallon sized baggie and keep them in the freezer.  When you need bread crumbs for a recipe, just take out what you need.  
You can use some of your home made bread crumbs to make shake and bake pork chops!

Thursday, June 27, 2013

Ninja Turtles!


My grandson just turned 4 and his party is this weekend.  The theme he wanted this year was Ninja turtles, so my daughter wanted me to make a Ninja Turtle pinata.  I've become the official pinata maker in the family (not by my choice) because it turns out I have a knack for it. 
To make this one, or any other pinata that you can think of, you'll need a 9 inch balloon or larger, some news paper, some string, masking tape, maybe some crepe paper, makers or other items to decorate it, and of course-candy/toys to fill it!  The best paper mache is this simple recipe that I found years ago:


Mix together a 1/2 cup of flour and 2 cups of cold water in a bowl.  


In a medium saucepan bring 2 cups of water to a boil.  When it boils pour in the flour and water that you have mixed in the bowl.  Bring this whole thing to a boil again.  

Once it boils again, remove from heat and stir in 3 tablespoons of sugar.  Let it cool.  As it cools it will thicken up.  When it's cool enough not to burn you, then it's ready to use. 


Rip a bunch of news papers into one inch strips, and start making your first layer.  Dip a strip of newspaper into the paper mache, and wipe of any excess with the side of your bowl, or run it between your fingers.  Then just start placing the stips on your balloon.  Placing them in various directions rather than just putting them on in a straight row, will make the pinata stronger.


Once you've covered the balloon  completely, let it dry for 24 hours before putting on the next layer.


When you complete the second layer, again let it dry for 24 hours.  After the second layer is dry, I like the add the string that the pinata will hang from.  With this pinata, I decided that the mouth of the balloon (where it's tied) will be the top of the Ninja Turtle's head, so I tied the string so it would hang that way.


Add some masking tape (or any tape that you have available) to a couple of places so that the string stays where you want it to.  


Once the string is taped down, tie a loop at the top of the pinata where it will hang.  


Pick up the pinata, and hold up up on your finger to double check that it will hang the way you want it to.  If it looks lopsided or off, adjust the strings until it looks the way you want it to. Once you have it just right, it's time to secure it with more layers of paper mache.


Apply a layer over the whole pinata, covering up the string.  Let the dry for 24 hours, apply another layer, and let that dry.  As you can see, a big part of making a pinata is waiting for it to dry!
We bought some green and blue crepe paper at the dollar store to decorate it. Since the dollar store didn't have any orange crepe paper to make Michelangelo  we had to settle for Leonardo. ( He has the blue bandanna)


First I put a put a couple of layers of green on .  To do this I used an old paint brush.  I dipped the brush into the paper mache, painting it onto the surface, and stuck the crepe paper on top of the place that I had just painted.  I then used the brush to smooth this down, like I've seen people do on craft shows when they are applying gold leaf.  I suspect  applying crepe paper is similar to that, because when it is wet it's really fragile and flimsy.


After the first layer of green dried, I added another layer because I could still see the newsprint through it.
I did the same with the blue to make his bandanna   I drew  some Ninja Turtle eyes and mouth with markers on printer paper.  I attached these the same way I did with the crepe paper.

*Edit (Thanks Reddit)-I leave a small hole in the top where the mouth of the balloon was, to put the candy in. 


Here is the finished Leonardo.  I wondered it he looked too scary, but my 21 year old son, who was a fan of the turtle himself when he was younger told me he looked just like the movie.  


**I'll add more pictures of the candy we fill it with, and after it gets broken at the party this weekend.

Saturday, May 25, 2013

Chocolate PB cake in a mug from scratch!

It's one of those rainy and dreary here in New England.  It has been raining for days in fact, so I needed to eat something sweet. ;)  I love mug cakes because then I don't have leftover cake lying around for me to binge on.  Win win!  This is perfect if you live alone too, because it makes one perfect serving. Anyway I found this recipe and it really hit the spot!  It only took a few minutes to make too.  You're going to LOVE this!


Chocolate Peanut Butter Mud Cake


2 tablespoons flour 
1 tablespoon of sugar
2 teaspoons unsweetened cocoa powder 
1/4 teaspoon baking powder
Pinch salt
2 tablespoons milk
1 tablespoon oil 
handful of chocolate chips
1 Tbs peanut butter or nutella

In a small mug combine the flour, sugar, cocoa powder, baking powder and salt until no lumps remain. 


Stir in the milk and oil until smooth. Make sure to scrape your fork around the edges of the cup so you don't get pockets of dry flour. 


Mix in the chocolate chips. Drop the peanut butter into the chocolate mix and push it down to submerge.


Bake in the microwave on high for 1 minute. 

You may need to add or subtract 5-10 seconds depending on your microwave, but don’t be tempted to overcook or it will be dry. It should still be moist on the bottom and will continue cooking as it sets.  That's it!  This is so delicious!  I'm not sure of the calorie content, but it's such a small amount...just  enjoy yourself!


Friday, April 26, 2013

Ranch Dressing


I've made this recipe for several years.  I've tweaked it a lot, and I think I've finally got it just right. My daughter wanted the recipe, so I thought I would share it on here too.  Enjoy!

Ranch Dip or Dressing

1/4 teaspoon of salt
1 teaspoon of Parsley (dried)
1/2 teaspoon of garlic powder
1 teaspoon of onion powder
1/2 cup of mayo
1/2 cup of sour cream.

If you're making dip, leave it like it is.  It will be thick enough to dip veggies in etc.  If you want a salad dressing, mix in a little bit of milk until it is the consistency that you like.  If you don't have any sour cream in the house it's no biggie, just use one cup of mayo.   This will probably keep about a week in the fridge.  

*Make sure your dried parsley is bright green.  If it's dark green or brown, throw it out because it's probably old!

Tuesday, April 16, 2013

Mini books!

This past weekend, I went to a book making workshop.  One of the first things we did was learn how to fold  and cut a piece of printer paper to make a mini book. I thought this was so cool, and can't believe I've never seen it before.  The possibilities are endless.  You can make them with the kids, and they call fill them with their artwork.
For each mini book you'll need one piece of printer paper, scissors, and pens, markers etc.

Fold it in half this way, and crease it well.

Open it up and fold in half again the long way. 

With it still folded the long way, fold this in half, then in half again.


When you open up the paper, these are the folds you should have at this point.

Next, you'll need to make a cut in the middle where I"ve drawn the line.  To do this, I fold the paper the short way and cut as shown.

This is what the cut should look like.

With the paper standing on the table, and the cut in the middle, hold each end of the paper and push it together, and crease.


Before creasing it should look like this:

That's all there is to it.  Now for the fun part.  Fill your book with words or artwork!

Here is an example that the instructor made:

Here's one of mine.  :)

You can do it with whatever paper you  have around.  Construction paper, junk mail, etc.  It doesn't need to be this size either.  You can make them larger or smaller.  

Sunday, March 24, 2013

Chicken Gumbo (Chicken and Dumplings)

Most people call this Chicken and Dumplings, but when my kids were little we called it Chicken Gumbo, and it stuck.  I've been making it for over 20 years, and it's still one of our favorite go to foods
Start with a small roaster chicken, or a split chicken breast, or some boneless chicken breast.  (Whatever chicken you have in the house will work) Today I'm using boneless chicken breast, because that's what I had in the freezer.  Place your chicken in a medium/large pot.  Fill with water until the pot is 3/4 full.
Add some cut up onion, some dried parsley, a couple of garlic cloves, and some celery cut up into large pieces.  (You can keep celery seed in the house for those times  when there is no celery in your fridge)  If using celery seed, add about a teaspoon.
Turn the heat to high and bring this to a boil.  As soon as it boils, turn down the heat and cover.  
Let this simmer for a couple of hours.
Meanwhile, you can make the dough for the dumplings.
In a large bowl add 
2 cups of flour
1/4 tsp of salt
2 Tablespoons of shortning
Cut the shortning into the flour and salt.  
You can use one of these tools, a butter knife or your hands to do this.   
When the shortening is all incorporated into the flour, add 1/2 cups of water, and a large egg.   
Mix this all together, and knead the dough for a few minutes.  
Cover it and set it in the fridge for later.
After the chicken and veggies have been simmering for a couple of hours, you'll have a nice chicken broth in the pot, and the whole house will smell good. Talk out the chicken and place it on a plate.  
Strain out the veggies, garlic, etc and put the broth back into the pan
Cut the chicken into bite sized pieces
Put the cut up chicken pieces back into the broth in the pot.  Bring this back to a boil
Remove the dough from the fridge.  Using one small piece of dough at a time, roll it out as thin as you can.
Cut this into squares or rectangles.  
My family likes 2 inch noodles, but you can cut them as big or small as you like.
Set these aside and roll out some more dough and cut it into squares.  
Continue until you've rolled out all the dough, and cut it all into noodles.
When the broth in the pan is boiling, start dropping in your noodles. one at a time.  
They will drop the the bottom at first then rise up to the top.  
Keep dropping them in until all the noodles are in the pot.  Let this boil for 5- 10 minutes.
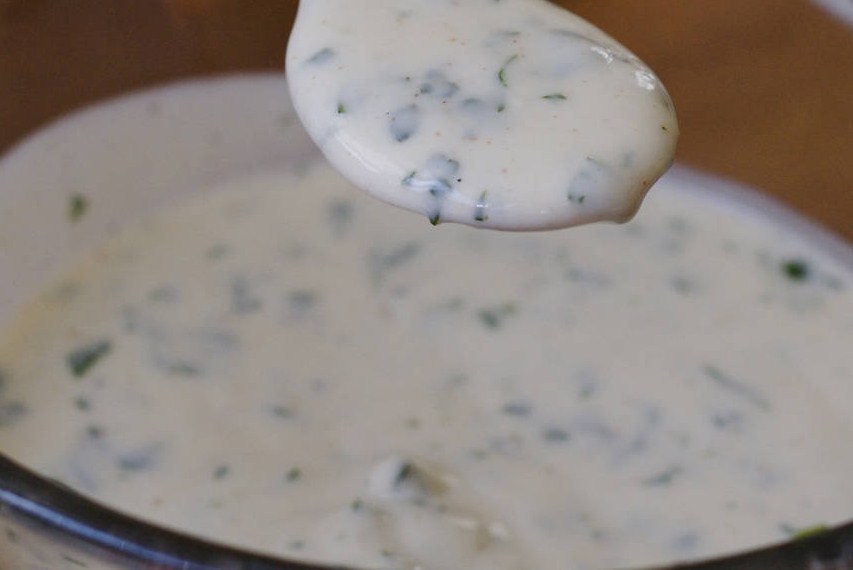
Last, I like to thicken up the broth in the pan to make a chicken gravy.  
Whisk together a couple of tablespoons of flour with about a 1/4 cup of water until smooth.  
Pour this into the boiling soup and stir.  It will quickly thicken up to look something like this:
At this point I add some more dried parsley, and a little bit of fresh black pepper.
Let everyone add their own salt to taste.
You can have this alone, or with some chunks of bread  or homemade biscuits for dipping. 
I also wanted to note that I always double the noodle recipe, because in our family everyone loves them, and there are never enough!  :)